バーチャルホストでHTTPSを使ったWebサーバー構築
Webサーバーのリソースを複数のサイトで共用する方法の1つに「バーチャルホスト(VirtualHost)」があります。
本マニュアルでは、複数のホスト名(FQDN)から、1つのパブリックIPアドレスをもつWebサーバーにHTTPSアクセスする環境を例に、ネームベースのバーチャルホスト設定方法を紹介します。
WebサーバーはApache httpdを、SSL証明書はLet’s Encryptを使用します。
(本マニュアルでは、お客さまにてドメインを取得し、DNSを運用されている前提とします。ここでは例として、ドメイン:example.comとして説明します。)
目次
- 仮想マシンの作成
- DNSレコードの設定
- Webサイト環境構築
- SSL証明書とHTTPS設定ファイルの作成

1. 仮想マシンの作成
この章ではWebサーバー用の仮想マシンを作成します。
- 仮想マシンを作成します。
仮想マシンの作成方法は、「Webサイトの本番環境を構築したい(Web1台構成)」の「1. 仮想マシンの作成」をご参照ください。
設定例は下記の通りです。
| 項目 | 設定内容 |
| マシンタイプ | Light.S1 |
| イメージ | 標準テンプレート ー Rocky Linux 9.4 64-bit |
| ボリューム | データディスクなし(空欄のまま) |
| SSH Key | ※注1 |
| 仮想マシン台数 | 1台 |
| ネットワークインターフェース | ※注2 |
| 詳細情報 - マシン名 | web01 |
| 詳細情報 - グループ | (なし) |
- ※注1: SSH Keyの項目は、SSH秘密鍵を未作成の場合は[作成]を選択し、生成された秘密鍵をローカルPCに保存します。詳しくは「めちゃ楽ガイド」6ページの手順3をご参照ください。
- ※注2: ご利用のアカウントによってネットワークインターフェースとして選択できるゾーン名が異なります。普段お使いのゾーン名をご選択ください。
- ファイアウォールとポートフォワードの設定を行います。
設定方法は、「Webサイトの本番環境を構築したい(Web1台構成)」の「2. ネットワークの設定(ファイアウォールとポートフォワードの設定)」をご参照ください。
ファイアウォールとポートフォワードの設定例は以下のとおりです。
(Let’s EncryptのSSL証明書作成時にポート80を使用します)
ファイアウォール設定例
| コメント | ソースCIDR | タイプ | ポートレンジ |
| HTTP | Any | HTTP | 80 |
| HTTPS | Any | HTTPS | 443 |
| SSH | My IP | SSH | 22 |
ポートフォワード設定例
| コメント | パブリックポート | プライベートポート | 仮想マシン |
| HTTP | HTTP | 80 | web01 |
| HTTPS | HTTPS | 443 | web01 |
| SSH | SSH | 22 | web01 |
- 仮想マシン「web01」にsshログインできることを確認します。
アクセス方法は「Webサイトの本番環境を構築したい(Web1台構成)」の「3. 仮想マシンへのアクセス」をご参照ください。
2. DNSレコードの設定
対象のFQDNに対する名前解決の設定を行います。
Let’s Encryptではドメイン名でサーバー認証を行うため、事前に対象FQDNに対して名前解決できる状態にしておきます。
IDCFクラウド DNSでの設定例を紹介します。お客さま環境に応じて、同様の設定を行ってください。
IDCFクラウド DNSの詳細な操作手順については「DNS/GSLBご利用ガイド」をご参照ください。
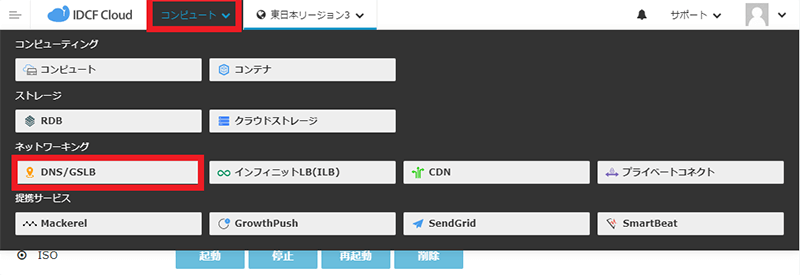
- [コンピュート]をクリックしてサービス一覧を表示し、ネットワーキングより[DNS/GSLB]をクリックしてください。
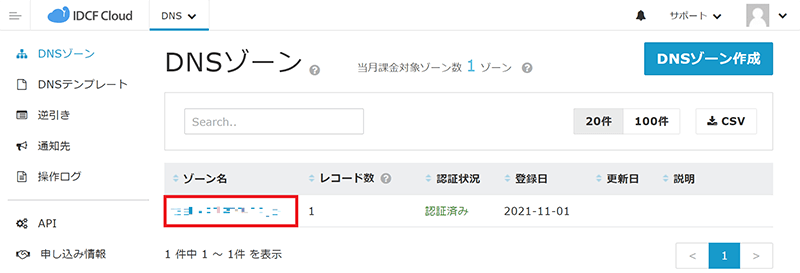
- 作成してあるDNSゾーン名をクリックしてレコード設定画面を表示します。 ※DNSゾーンを作成していない場合は別途DNSゾーンを作成してください。
- [+レコード登録]をクリックして、FQDNの数に応じたAレコードを登録します。
設定例は以下のとおりです。ここでは2つのAレコードを設定します。
| タイプ | レコード名 | GSLB | TTL | 値 |
| A | www1 | 無効 | 600 | 「1.仮想マシンの作成」の手順2で確認したパブリックIPアドレス |
| A | www2 | 無効 | 600 | 同上 |
※今回はGSLB機能は使わないので無効とします。GSLBについては「DNS/GSLB ヘルプ」をご参照ください。
3. Webサイト環境構築
仮想マシン「web01」にてWebサイト環境構築を行います。ここでは、HTTPでアクセスできる環境を準備します。
- 仮想マシン「web01」にsshログインし、Webサイト環境構築を行います。 Webサイト環境構築方法は「Webサイトの本番環境を構築したい(Web1台構成)」の「4. Webサイト環境構築」をご参照ください。
- 仮想マシン内のファイアウォール設定が必要なので、まずは許可されているservicesを確認します。
# firewall-cmd --list-all public (active) target: default icmp-block-inversion: no interfaces: ens160 sources: services: cockpit dhcpv6-client http ssh ports: protocols: forward: yes masquerade: no forward-ports: source-ports: icmp-blocks: rich rules: - httpsが許可されていないので、設定を追加します。
# firewall-cmd --add-service=https --permanent success - 設定の反映をするため下記のコマンドを実行します。
# firewall-cmd --reload success - ファイアウォール設定でhttpsが許可されたことを確認します。
以下のようにservicesの項目にhttpsが含まれることを確認します。# firewall-cmd --list-all public (active) target: default icmp-block-inversion: no interfaces: ens160 sources: services: cockpit dhcpv6-client http https ssh ports: protocols: forward: yes masquerade: no forward-ports: source-ports: icmp-blocks - VirtualHostおよび関連設定を行います。
設定例は以下の通りです。ドメイン(example.com)は、お客さまにて運用されているドメインに読み替えてください。// 2サイトのDocumentRootおよびコンテンツを作成 [root@web01 ~]# mkdir /var/www/html/www1 [root@web01 ~]# mkdir /var/www/html/www2 [root@web01 ~]# echo www1 > /var/www/html/www1/index.html [root@web01 ~]# echo www2 > /var/www/html/www2/index.html // VirtualHost設定を作成 [root@web01 ~]# cat<<EOF > /etc/httpd/conf.d/vhost.conf <VirtualHost *:80> DocumentRoot /var/www/html/www1 ServerName www1.example.com </VirtualHost> <VirtualHost *:80> DocumentRoot /var/www/html/www2 ServerName www2.example.com </VirtualHost> EOF // Apache httpdのコンフィグ文法チェック [root@web01 ~]#apachectl configtest // Apache httpd再起動 [root@web01 ~]# systemctl restart httpd - ブラウザより、設定したFQDNに対してHTTPアクセスを行い、アクセスできることを確認します。 ブラウザに入力するURL例は以下のとおりです。
http://www1.example.comhttp://www2.example.com
4. SSL証明書とHTTPS設定ファイルの作成
Let’s EncryptのCertbotクライアントを使用してSSL証明書とHTTPS設定ファイルの作成を行います。
OS,Webサーバー毎に手順が異なりますので、詳細はCertbot公式サイトをご参照ください。
以下、CentOS7,Apache httpdでの設定例です。
snapdをインストールします。ここでは、後で必要になるmod_sslもあわせてinstallします。
[root@web01 ~]# dnf -y install epel-release
[root@web01 ~]# dnf -y install snapd mod_ssl
[root@web01 ~]# systemctl enable --now snapd.socket
[root@web01 ~]# ln -s /var/lib/snapd/snap /snap
ログアウトして再度ログインするか、仮想マシンを再起動して、snapのパスが正しく更新されていることを確認します。
// $PATHに/var/lib/snapd/snap/binが含まれることを確認。
[root@web01 ~]# echo $PATH
/usr/local/sbin:/usr/local/bin:/usr/sbin:/usr/bin:/var/lib/snapd/snap/bin:/root/bin
以下のコマンドを実行して、最新バージョンのsnapdを使用していることを確認します。 「error: too early for operation, device not yet seeded or device model not acknowledged」のエラーが表示された場合は、1分程度待って再度コマンド実行してみてください。
[root@web01 ~]# snap install core
[root@web01 ~]# snap refresh core
certbotをinstallします。
[root@web01 ~]# snap install --classic certbotcertbotコマンドの準備をします。
シンボリックリンクを作成し、certbotのバージョンが表示されることを確認します。[root@web01 ~]# ln -s /snap/bin/certbot /usr/bin/certbot [root@web01 ~]# certbot --versionSSL証明書の取得と、httpsアクセスに必要なhttpd設定を作成します。 以下は、コマンド実行例です。
[root@web01 ~]# certbot --apache
Saving debug log to /var/log/letsencrypt/letsencrypt.log
Enter email address (used for urgent renewal and security notices)
 (Enter 'c' to cancel): <メールアドレスを入力>

- - - - - - - - - - - - - - - - - - - - - - - - - - - - - - - - - - - - - - - -
Please read the Terms of Service at
[https://letsencrypt.org/documents/LE-SA-v1.2-November-15-2017.pdf](https://letsencrypt.org/documents/LE-SA-v1.2-November-15-2017.pdf). You must
agree in order to register with the ACME server. Do you agree?
- - - - - - - - - - - - - - - - - - - - - - - - - - - - - - - - - - - - - - - -
(Y)es/(N)o: Y

- - - - - - - - - - - - - - - - - - - - - - - - - - - - - - - - - - - - - - - -
Would you be willing, once your first certificate is successfully issued, to
share your email address with the Electronic Frontier Foundation, a founding
partner of the Let's Encrypt project and the non-profit organization that
develops Certbot? We'd like to send you email about our work encrypting the web,
EFF news, campaigns, and ways to support digital freedom.
- - - - - - - - - - - - - - - - - - - - - - - - - - - - - - - - - - - - - - - -
(Y)es/(N)o: Y
Account registered.

Which names would you like to activate HTTPS for?
- - - - - - - - - - - - - - - - - - - - - - - - - - - - - - - - - - - - - - - -
1: www1.example.com
2: www2.example.com
- - - - - - - - - - - - - - - - - - - - - - - - - - - - - - - - - - - - - - - -
Select the appropriate numbers separated by commas and/or spaces, or leave input
blank to select all options shown (Enter 'c' to cancel): 1,2
Requesting a certificate for www1.example.com and www2.example.com

Successfully received certificate.
Certificate is saved at: /etc/letsencrypt/live/[www1.example.com/fullchain.pem](https://www1.example.com/fullchain.pem)
Key is saved at:         /etc/letsencrypt/live/[www1.example.com/privkey.pem](https://www1.example.com/privkey.pem)
This certificate expires on 2022-02-24.
These files will be updated when the certificate renews.
Certbot has set up a scheduled task to automatically renew this certificate in the background.

Deploying certificate
Successfully deployed certificate for www1.example.com to /etc/httpd/conf.d/vhost-le-ssl.conf
Successfully deployed certificate for www2.example.com to /etc/httpd/conf.d/vhost-le-ssl.conf
Congratulations! You have successfully enabled HTTPS on [https://www1.example.com](https://www1.example.com) and [https://www2.example.com](https://www2.example.com)

- - - - - - - - - - - - - - - - - - - - - - - - - - - - - - - - - - - - - - - -
If you like Certbot, please consider supporting our work by:
 * Donating to ISRG / Let's Encrypt:   [https://letsencrypt.org/donate](https://letsencrypt.org/donate)
 * Donating to EFF:                    [https://eff.org/donate-le](https://eff.org/donate-le)
- - - - - - - - - - - - - - - - - - - - - - - - - - - - - - - - - - - - - - - -
[root@web01 ~]#
参考までに、vhost.confとvhost-le-ssl.confを確認します。
vhost.confではRewriteに関する設定(「RewriteEngine」「RewriteCond」「RewriteRule」の行)が追加され、vhost-le-ssl.confでは、証明書(cert.pem)、中間証明書(chain.pem)、秘密鍵(privkey.pem)が設定されたことが分かります。[root@web01 conf]# cat /etc/httpd/conf.d/vhost.conf <VirtualHost *:80> DocumentRoot /var/www/html/www1 ServerName www1.example.com RewriteEngine on RewriteCond %{SERVER_NAME} =www1.example.com RewriteRule ^ https://%{SERVER_NAME}%{REQUEST_URI} [END,NE,R=permanent] </VirtualHost> <VirtualHost *:80> DocumentRoot /var/www/html/www2 ServerName www2.example.com RewriteEngine on RewriteCond %{SERVER_NAME} =www2.example.com RewriteRule ^ https://%{SERVER_NAME}%{REQUEST_URI} [END,NE,R=permanent] </VirtualHost> [root@web01 conf]# [root@web01 conf]# cat /etc/httpd/conf.d/vhost-le-ssl.conf <IfModule mod_ssl.c> <VirtualHost *:443> DocumentRoot /var/www/html/www1 ServerName www1.example.com SSLCertificateFile /etc/letsencrypt/live/[www1.example.com/cert.pem](https://www1.example.com/cert.pem) SSLCertificateKeyFile /etc/letsencrypt/live/[www1.example.com/privkey.pem](https://www1.example.com/privkey.pem) Include /etc/letsencrypt/options-ssl-apache.conf SSLCertificateChainFile /etc/letsencrypt/live/[www1.example.com/chain.pem](https://www1.example.com/chain.pem) </VirtualHost> </IfModule> <IfModule mod_ssl.c> <VirtualHost *:443> DocumentRoot /var/www/html/www2 ServerName www2.example.com SSLCertificateFile /etc/letsencrypt/live/[www1.example.com/cert.pem](https://www1.example.com/cert.pem) SSLCertificateKeyFile /etc/letsencrypt/live/[www1.example.com/privkey.pem](https://www1.example.com/privkey.pem) Include /etc/letsencrypt/options-ssl-apache.conf SSLCertificateChainFile /etc/letsencrypt/live/[www1.example.com/chain.pem](https://www1.example.com/chain.pem) </VirtualHost> </IfModule> [root@web01 conf]#Apache httpdのコンフィグ文法チェックと再起動を実施します。
// Apache httpdのコンフィグ文法チェック
[root@web01 ~]#apachectl configtest
// Apache httpd再起動
[root@web01 ~]# systemctl restart httpd
certbot自動更新のテストを行います。
[root@web01 ~]# certbot renew --dry-run
//「Congratulations, all simulated renewals succeeded:」と表示されたらOK

[root@web01 ~]# systemctl list-timers
// snap.certbot.renewのNEXTに予定時刻が表示されていればOK
ブラウザより設定したFQDNに対してHTTPSアクセスを行います。 ブラウザに入力するURL例は以下のとおりです。
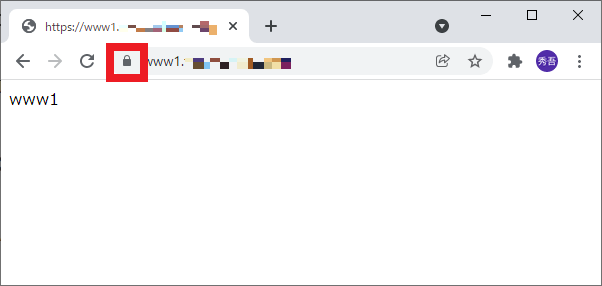
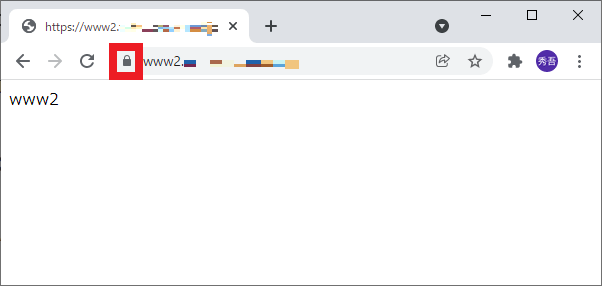
https://www1.example.comhttps://www2.example.com証明書エラーが出ずに、テストページが表示されれば問題ありません。
鍵マークをクリックし、証明書を確認しエラーがないか確認します。(以下は、Chromeの例です。ブラウザにより挙動が異なる可能性があります)
以上でバーチャルホスト環境にHTTPSでアクセスできることが確認できました。
本マニュアルでは説明のためにApacheを利用しましたが、Nginxでも設定可能です。
証明書を発行したLet’s Encrypt(Certbotクライアント)はLinux Foundationのコラボレートプロジェクトで、ISRGが中心となり複数企業で運営を行っています。
2016年4月12日に正式サービスとしてリリースされました。
手軽に暗号化して通信を行いたい場合や今回のようにHTTPSのテストを行いたい場合等、さまざまなシーンで有用なサービスです。
しかしながら、身元審査等は行わないため、信頼されたサイトの証明として使用する場合は、OV証明書、EV証明書を使用することをおすすめします。
関連情報